The Adrino series of boards is an example of a microprocessor circuit that removes some of the complexity out of a circuit by allowing the user to use a relatively simple program to get inputs controlling outputs and vice-versa.
The Arduino and Raspberry pi are similar, in as much as they are a compact system controller. The Arduino is only able to run one program at a time and is comparatively simpler to learn and use. The Basic arduino uno just needs the cover stripping of the single core cable being used to be able to connect to the pins. The pi can run several programs however, is harder to get a grounding on, and the basic unit needs sockets to attach to the connections, or another board. Most units needing a microprocessor in the lab space are only required to run one setup at a time, and can be easily reprogramed between setups if needed.
The Arduino can be used to help work out what is needed before a specialist board with microprocessor attached is produced. This can help reduce costs, however, has the downside that the new board is unlikely to be able to be programmed using the same software.
Most of the standard Arduino's are designed to allow users to modify the circuit that it is in without having to mess around with wich pins on the prossesor(s) can/cannot be used. This is achieved by either being able to be plugged into a breadboard, of which single core wires can be plugged into, or have the wires plugged directly into.
The boards have a number of analogue input pins and digital input/output pins which are labelled up (version dependant). To get an analogue output pin, the user needs to use a PWM pin (a digital Pulse Width Modulation pin) and use a resistor/capacitor (RC) filter to get the analogue value out. This will not be a high powered output, and there may well be some noise on the output dependant upon the RC filter circuit used.
There are circuits that are produced that can be wired up to any of the various Arduino boards, via a combination of the digital pins and power pins and connect to various components. Because some of the people attracted to the Arduino have little circuit design knowledge, there are boards premade online called 'shields' that include (but is not limited to) motor drives, speakers/headphones drives, optical sensors, and audio sensors along with smaller board that need wiring to connect to, such as some that have RC filters premade for the analogue output from the PWM output. The full sized shields generally connect to all of the pins, and some have through-connectivity, allowing shields to be stacked. This feature is only on the lower powered/featured shields due to connecting to the shield and size of the bigger components.
There are some circuits or setups that the Arduino board is used to control the PID aspect of a feedback loop, by taking in an analogue signal, and putting out a separate controlling digital signal. This setup would either be able to have the PC set the 3 PID controls, or take in a potentiometer for each of the 3 settings, or 2 if only 2 are needed.
In addition to the pins down each side, all of the standard and in general, larger units, have a 6 pin header containing the pins for the SPI bus which allows the board to speak to other microprocessors in a standard manner, allowing for easier communications between some chips.
Below are a few of the more common Arduino boards, however there are others. Some are smaller however do not have as many functions, others have different footprint styles, but for now they are not pictured here. There are also different company's that have made similar units; however they are coloured differently. The original units may be coloured or setup differently from those pictured.
|
Picture of the standard unit. (not to scale)
|
General use of the unit.
|
|
|
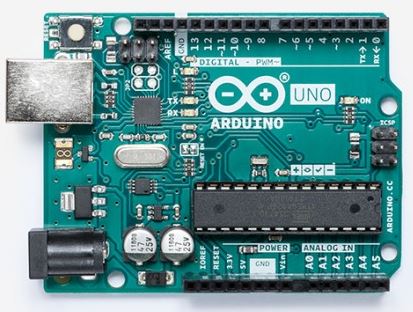
The Arduino uno. The larger of the types here, and is what most of the plug in circuit boards made by Arduino are designed for. Most people are referring to this board when they speak of an Arduino board, so take care when referring to another board!
This board has 3 methods of being powered; first, through the USB connector. This can supply 500mA, of which some is used for the on-board components. The second method is through the barrel connector. This can supply more power, and is connected to the Vin pin which has similar power characteristics.
The annoying feature of this board, is that in the two sets of header pins, there is a gap (near the middle) that is not equal to the normal pin spacing of the unit. this proves awkward for designing the board layout, however it does mean that the board cannot by plugged in back to front as easily without noticing. This proves convenient if the user is not used to plugging the particular board into the unit.
The Arduino Mega (more digital pins) and Leonardo (different microprossesor) boards are very similar.
|
|
(arduino micro)
|
(arduino nano)
|
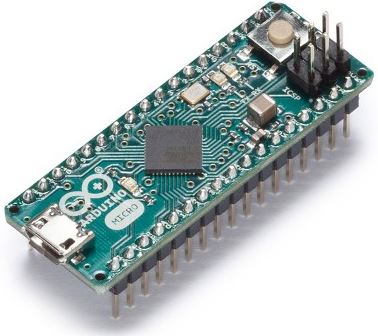
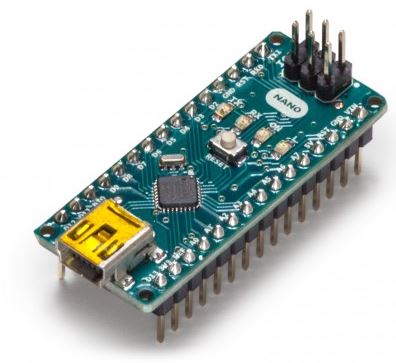
The Arduino Micro and Nano units are smaller than the uno, so doesn't have all of the same pins, however they have the benefit of all of the pins being in a standard pitch.
The Arduino nano can fit into slightly smaller areas than the micro, has a few less pins(6 less digital, 4 less analogue in), but on the positive side, the microprossesor has more RAM available for the program.
The Micro and Nano units can be interchanged with each other connection wise, because the extra pins on the end are non-critical pins.
This design is different to the Arduino because it has pins to connect to as opposed to sockets. This means that it is harder to connect to without any accessories. They also lack the barrel connector, so need power through the pin/attached circuit board, or via the USB socket.
Those 2 units can be plugged into breadboard to access the pins when wiring up a test circuit.
The design is designed to be plugged into a circuit environment, and be able to run a program without necessarily being plugged into a PC or laptop.
|
|
|
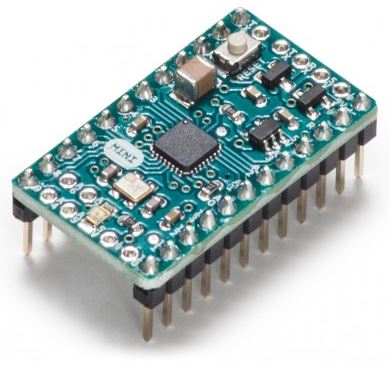
The Arduino mini. The smallest of the types pictured here.
The advantage is that it is smaller in height, so can be installed in thinner places. It is described as a 'compact Arduino nano' by the website.
With the Mini, there is no serial adaptor, so it cannot be connected up to a USB socket directly. On one of the edges there are pads for a SPI interface wich is the only way to connect to it for programming purposes. The advantage of this, is it is harder for other people to tamper with your code.
This board has been retired by arduino, however, simular can be got from other sources if needed.
|
|
|
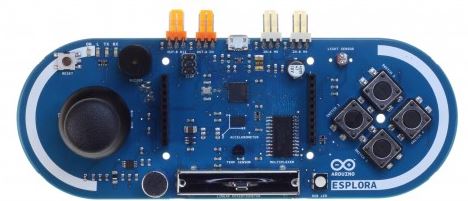
The Arduino Esplora. This design is one that is least common here. This design has a number of functions pre-attached to the board, such as a variable resistor, a few buttons and an LED to make learning to programming the unit easier.
This is designed to have specific units plugged in through either the 3 pin connectors on the top edge of the board, or the 2x10 pin connectors in the middle (designed for a screen).
|
With the Arduino Uno and Leonardo there are a few pin changes, however those are not many. The Uno is a little more expensive (~20%) however it has the advantage that the processor can be pulled out and replaced, either for easily changing the program, or if the user blows part of the chip up (over voltage or over current).
All of the units can be programed from the same computer interface which can be downloaded/used on the official Arduino website as and when needed.
With the Arduino Uno/Mega/Leonardo, because they have a standard pin out for the pins present on all versions, it is possible for us to make cards up that will plug into any of them. This allows us to create circuits that have the benefits of the Arduino, without having to compromise on adaptability for our jobs. This can also be done for the Micro/Mini/Nano, however they don't have the convenient pin compatibility. We can also produce a board that will plug in for you to your spec, with some/all of the components attached.
Because the Uno/mege/leonardo have a standard pinout and size, there are commercial boards available that can be bought to plug in. This allows for easy connectivity for standard functionality, however they are generally designed for only one function. Most modals however are designed to be stackable, allowing for several to be piled onto the same arduino board, however this may cause incompatibility if they require the same pins.
top